From Words to Wi-Fi: Using ChatGPT as an AI Agent to Configure Meraki Networks
- Marco
- Jan 19, 2025
- 7 min read

Requirements:
OpenAI Plus subscription
make.com account (a free plan should be sufficent)
meraki.com account
Integration between Meraki and make.com (not covered in this post)
Why?
In my opinion, AI Agents are set to be the hot topic of the near future. Automating tasks - especially in my case, Cisco networks - has been a huge game-changer and a crucial step forward. However, many of my colleagues, having 10+ years of experience and being known as CLI enthusiasts, were somewhat reluctant to learn the basics of coding and the concept of APIs.
The ability to use natural language for automation doesn’t just solve the challenge of learning to code for OG network engineers. It also addresses lean IT teams, as engineers no longer need to master every single technology. Instead, they can simply describe what they want to achieve, like:
Create a new SSID called X with a pre-shared key Y.
Fortunately, I wrote a blog about exactly that! Enjoy
In this post, we’ll use a GPT model as an AI Agent that sends requests to a make.com webhook. Make will then trigger REST calls to the Meraki API, and the responses from Meraki will be sent back to our GPT.

Because make.com is a SaaS application with integrations focused solely on other SaaS applications, we’ll center our attention on Meraki. This is a perfect fit since Meraki is the go-to product for lean IT teams and addressing challenges like limited resources.
Additionally, I’ll focus specifically on Wi-Fi. An agent isn’t well-suited for handling multiple tasks, which is why you’ll deploy an AI Agent army—each soldier focusing on a specific task, while a supervisor agent assigns tasks to the appropriate soldier.
In this post, we won’t dive into the concept of a full AI Agent army. Instead, we’ll focus on creating an agent designed for a specific task.
So lets dive into the technical part:
Creating a now GPT for the Task
First, we’ll create a new GPT on OpenAI. Start by giving it a name, then either create a logo using DALL-E or find one online. Next, move on to the instructions.
Prompting was a valuable skill recently, but in my opinion, it has become almost obsolete with the introduction of the o1 model, which uses reasoning. I recommend using o1 to craft the prompt and then applying it in 4o.

Write down the role of this GPT, your objectives for it, and a standard operating procedure (SOP). It doesn’t have to be perfect at this stage - it’s just to help you structure what you want to achieve and how to do it. This will come in handy in just a moment.
Creating a workflow on make.com
Next, we’ll create the bread and butter of this scenario:
the make.com workflow. Hurray!
We’ll start with a webhook, which allows us to send information from ChatGPT to our workflow.
To begin, we need a custom webhook. Add it by clicking the plus sign:

Give it a name and make sure that you open the advanced options and enable all options:
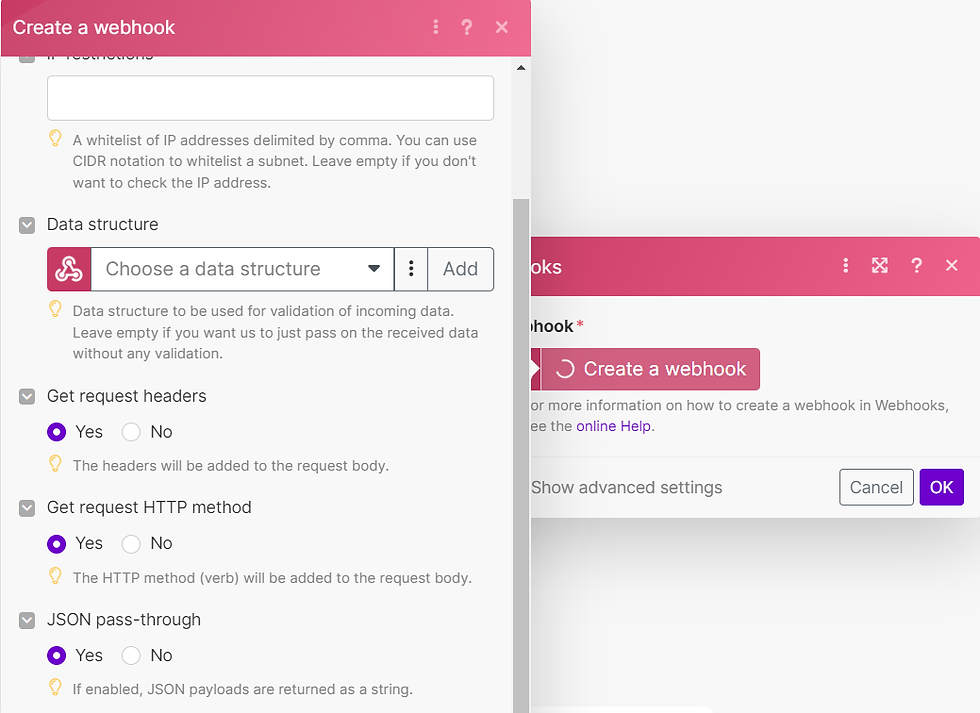
save the URL to a word file or something like that. We will need this information later.

Because we want different workflows, depending of what we want to do, grabbing information's or sending configuration changes, we need a router. Add this to the webhook and click on the link between the bubbles. Doing this we can configure the condition on which the router decides which workflow will be used. Because we will use a GET request for grabbing informations we will configure it like this:

Now we’re getting closer to our goal of using the Meraki REST API to retrieve all SSIDs.
According to the Meraki API documentation, we need a network ID for the API call. Fortunately, this can be easily gathered thanks to the native integration of these APIs.
Search for the Meraki bubble and select Get a Network. Uncheck Map and use the dropdown menu to select your organization and the network you want to work with.

Next, we connect another Meraki bubble. This time, the Make an API Call bubble.
Since we need the network ID, we can drag and drop the required information from any of the bubbles along the workflow leading to this one. In our case, it’s the one to figure out the network ID.

Since agents can’t handle multiple files effectively and work best with structured data, we’ll add two bubbles next: one to merge all the information into a single object and another to transform this into JSON.
First, add the Array Aggregator, select the API Call as the data source, and choose only the body of the response.

Next, add the Transform to JSON bubble and select the body of the response array we just created.

Pro tip: You can test the workflow at any time by temporarily disconnecting the connection between the router and the first Meraki bubble. Then, drag and drop the thunder icon from the webhook to the first Meraki bubble.
By pressing Run Once, you’ll be able to see the results at every step of the workflow and identify any errors that might occur.
Finally, complete the GET workflow by adding the Webhook Response bubble.


Congratulations! You´ve created your first workflow!
Adding abilities and interfaces to the GPT
Now we come to the most complex part—but no worries, ChatGPT has your back!
We need to create a schema so our GPT understands its capabilities.
Unfortunately, at the time of writing, make.com doesn’t have great documentation for this. However, I found an excellent guide on zapier.com! I’m even considering trying Zapier next time because having good documentation is a huge advantage.
To proceed, follow these instructions:
Go back to your GPT.
Scroll down and click Add Actions.
Paste the URL from the Zapier documentation to generate an example schema.

I decided to guide you through this method rather than pasting the schema directly into this post. This way, if the schema changes, you’ll always be working with the most up-to-date version.
Next, copy the schema and use o1 to adapt the example to your specific needs.
You can use a prompt like this:
here is an example schema from zapier:
<paste in the whole schema from zapier>
I am creating a own gpt. take the schema an alter it for:
Server: https://hook.eu2.make.com
path: /cgo8ef1l2e9x3xcv58e46fb5xedtivh1
use GET to query for SSIDs
This approach worked for me on the first try. If you encounter any errors while pasting this into your GPT, simply take the error message, paste it back into the chat, and let ChatGPT correct it for you.
Once completed, you should see the endpoint and be able to test it successfully.
At this point, double-check the instructions and use o1 to help define the schema further. You can use something like this:
---getting Informations---
GET (list_ssids) ⇒ Show SSID number and name. Do NOT show the psk in the out!
if the user reuqests the SSIDs (names of the Wifi networks), that give a Talbe with Number - SSID name
You can now ask GPT to list all your SSIDs:

Our GPT is now ready to read and display our configuration!
Creating workflow for configuration changes
The next step is about creating a workflow to configure our network exactly as we want it.
A quick look at the Meraki documentation reveals that we’ll need a PUT request to accomplish this task. To proceed, return to make.com and add a new route to our router specifically for this request method.

Now that we've completed this, we’ll retrieve the network ID again and add the Meraki bubble to call the API.
Here’s where it gets a bit more complex. According to the Meraki API documentation, we need to specify the SSID number in the URL. To address this, here’s what I did:
Return to the chat where you initially requested the schema.
Use the same chat and ask to augment the schema.
The augmentation should include:
Another method using PUT to send a JSON payload to the webhook.
An additional field, separate from the body, to handle the SSID number (as an integer). A query parameter is what worked for me.
Once you have the updated schema, replace the original schema in your GPT with the new one.
If you encounter any errors during this process, simply ask ChatGPT to correct the schema.
At the end of this process, you should see a second endpoint.

The next step involves augmenting the instructions, which is a critical part of the process.
Start by clearly describing what you want to accomplish with the configuration changes. My approach was to offer two possible options: Simple and Advanced.
Simple: The user is prompted to provide only three parameters: the SSID number, SSID name, and PSK (Pre-Shared Key).
Advanced: This option allows the user to specify every parameter documented in the Meraki API documentation.
For the advanced option, you’ll need to include the JSON payload for the API call as specified in the Meraki docs. This ensures that all configuration possibilities are available.
Example section of my instructions:
---configuring the network---
PUT (create_or_update_ssids) ⇒ Send JSON body to configure SSIDs.
FLOW:
Step 1: Check if required actions exist.
Step 2: If missing, provide link to Make.com and wait for user input. Otherwise proceed to Step 4.
Step 3: After user replies configuration change, go back to step 1.
Step 4: Execute request with the exact JSON body.
EXAMPLE JSON (PUT):
{"name":"Test Lab SDNnovation - wireless","enabled":true,"splashPage":"None","ssidAdminAccessible":false,"authMode":"psk","psk":"C1sco12345","dot11w":{"enabled":true,"required":false},"dot11r":
<...>
":true,"availableOnAllAps":true,"availabilityTags":[],"speedBurst":{"enabled":false}}
Keep in mind, that the Numbers in the API starts with 0!
so if the users enters a number, you need to decrement it by 1. Example: entered 2, use 1!
Finalizing the make.com workflow
This step is crucial again: we need to send data so that make.com can update the fields and add them to the selectable choices! If we don’t send a webhook with the augmented field for the SSID number, it will not appear as an option in the workflow.
After asking our Meraki GPT to create an SSID, the fields should become visible(x-ssid-number in my case). Once they appear, drag and drop them into the workflow as needed.


Finish the PUT workflow by adding a Webhook Response bubble, just like before.
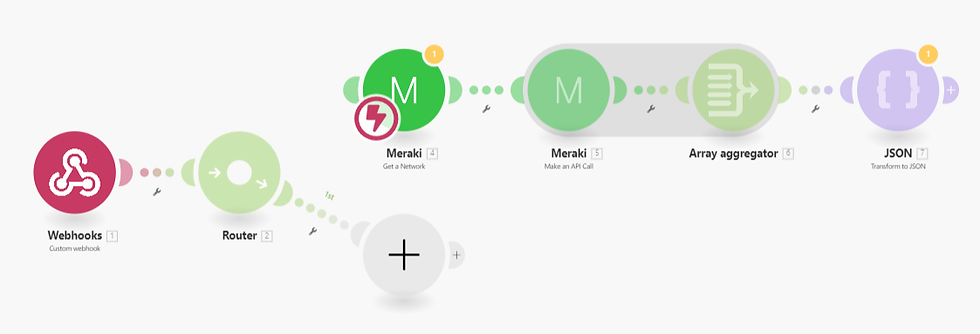
In the end, your make.com workflow should look like this:

Lets test it!


It worked! 🎉
If you’ve made it this far, congratulations - you’re awesome! I hope this guide gave you some insights and inspired you to explore even more possibilities. Happy agenting!


Comments